

Alright folks, so today I’m gonna walk you through my little adventure installing an exterior outlet box. Honestly, I ain’t no electrician, just a guy tired of tripping over extension cords for Christmas lights, ya know? Total beginner project, promise.

The “Wait, What Even Is This Thing?” Phase
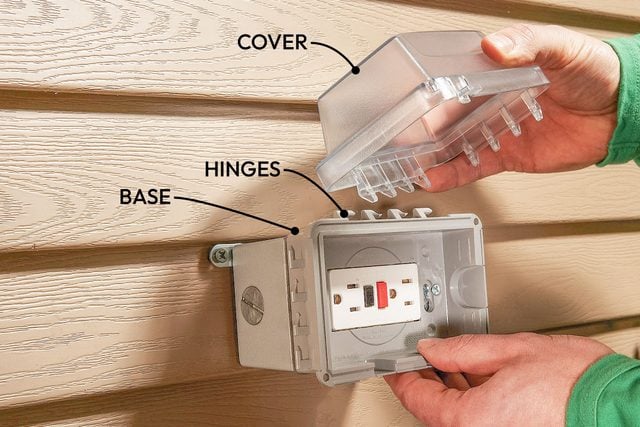
First off, had to figure out what I was dealing with. An exterior outlet box is basically that ugly plastic box you see stuck on the outside of houses where the plug is. It keeps all the wires safe from rain, snow, and whatever else Mother Nature throws. Mine looked busted and the old outlet was super loose. Time for a swap.
Scaring Myself Silly & Gathering Gear
My main rule? Don’t die. Seriously, electricity is scary. So first step was finding the breaker for the outlet INSIDE that feeds this outside one. Flipped switches like a madman until the lamp plugged into the inside outlet went dead. Got a little voltage tester pen too, just to double-check no juice was flowing. Better safe than crispy.
Stuff I gathered (most leftover from random projects or cheap from the big orange store):
- New exterior outlet box (the kind that’s rated for outdoors, important!)
- GFCI outlet (mandatory for outside, protects from shocks, again… don’t die)
- Screwdrivers (flathead & phillips)
- Wire strippers
- Needle-nose pliers
- That voltage tester (did I mention don’t die?)
Ripping Out the Old Hot Mess
Turned the power OFF again (seriously, check it twice). Unscrewed the ugly old cover plate and yanked it off. Unscrewed the old outlet itself from the box inside the wall. Saw three wires hooked up: Black (hot), White (neutral), and a bare Copper one (ground). Unscrewed those little terminal screws holding the wires and pulled the old outlet free. Peeked at the box itself – seemed solid enough, so decided to reuse it.
Hooking Up the New Guard (The GFCI)
Here’s where I slowed down. The GFCI outlet has specific spots. On the back, it had screws labeled “LINE”. That’s where the power comes from the house. Grabbed those wires coming out of my wall:
- Twisted the black wire clockwise onto the brass LINE screw. Tightened it down good.
- Twisted the white wire onto the silver LINE screw. Same deal, tightened hard.
- That bare copper ground? Hooked it under the green screw on the outlet, nice and snug.
Made sure no little strands of wire were poking out to touch anything they shouldn’t. Folded the wires carefully behind the new outlet.
Stuffing It Back In & Closing Up Shop
This part was a wrestling match. Carefully pushed the GFCI outlet, with all its wires tucked behind, back into the box inside the wall. It was a tight squeeze! Lined up the mounting holes and screwed the outlet into the box firmly. Finally, screwed on the new weatherproof cover plate – this one had a little flip-up lid thing to keep rain out.
The Moment of Truth (Sweating Bullets)
Took a deep breath. Walked back inside, went to the breaker panel. Flipped that breaker back ON. Grabbed my trusty voltage tester pen. Crept back outside, flipped open the cover on my shiny new outlet, and touched the tester to the hot screws… it beeped! Power was flowing. But was it safe? Plugged in a cheap lamp. Flipped the GFCI’s little “TEST” button. Click! Power went off. Then pressed the “RESET” button. Click! Light came back on. YES! It worked! Actually felt safer knowing the GFCI did its job.
Honestly? Not nearly as scary as I thought it’d be. Taking my time, double-checking everything, especially the power being OFF, was key. Now I can plug in my lights without that sketchy feeling. Looks professional-ish too, which is a bonus! If my dumb self can do it, you probably can too. Just go slow, stay safe, and for the love of all things, TURN OFF THE POWER!


